Creating a test
TAO defines a Test as a collection of Items designed to assess the academic progress of a Test-taker. This approach allows for the rapid assembly of tests administered across computer networks. If all you have is 30 minutes to create a 10-question quiz for your 8th grade class, TAO can help.
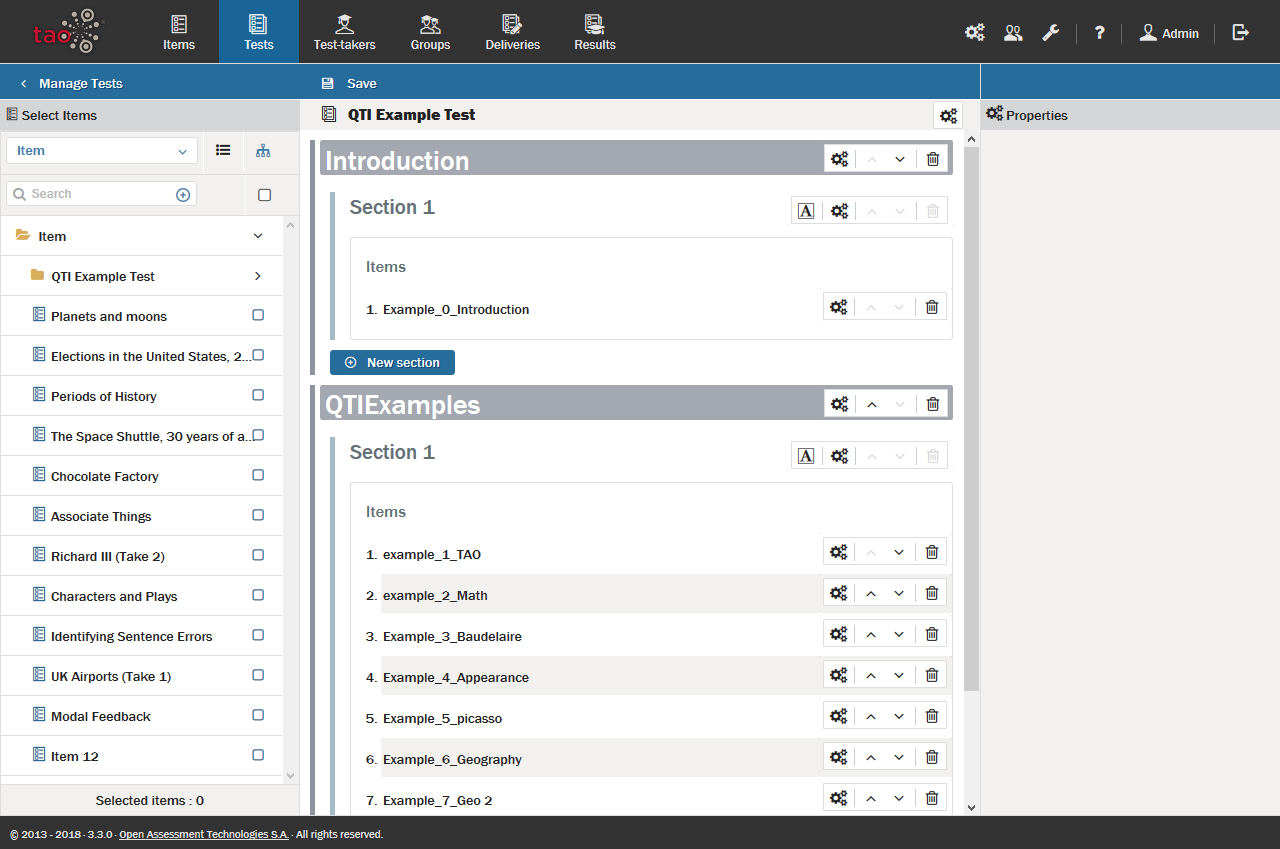
The image shows an example of a constructed test. If there are enough items in a test, it can be divided into separate test-parts and sections (as described in the steps below).
Now, let’s walk through the steps of creating a test.
1. Click on the Tests icon in the Assessment Builder Bar.
This will take you to the Tests page, and will show the last test which you, or the user before you, created. On the left-hand side of your screen you will see the Test Library of existing tests. The last test which was created will be highlighted in the library. In this tour, however, you will create a new test.
2. Click on the New test icon in the button bank under the library.
This will create a new test in the highlighted folder.
Note: To create a new test in a different folder, select the desired folder in the library, and then click on the New test icon in the button bank. To create a new folder (in TAO these represent new classes), click on New class in the button bank, and then give it a label. Highlight where to put the new folder relating to the new class.

3. Label and save your test.
Once you have created a new test, this will bring up a new dialog box which gives you the option of naming, or labeling your Test.
After labeling your test, click on Save. This produces an empty test, which you can now populate with items.
Note: It is always a good idea to save test assembly work every ten minutes or so, to prevent losing your work.
4. Click Authoring in the Action Bar to insert items into your test.
This will take you to the empty test you have created. You can now start to populate the Canvas in the middle (the test assembly) with items.
Tests can be divided into a hierarchy of two levels: Test parts, and Sections. A Test part is the first tier division of a test, while a section is the second tier division.
Test divisions, however, are optional, and they are added in reverse order. For instance, if a test has no divisions, all items will simply be added to Part 1 Section 1. If only one level of division is needed, adding sections will allow a test to be divided into two. If both levels are required, you need to add new test parts. To add new sections, click on the blue New section button below the existing sections in the test. To add new test parts, click on the blue New test part button below the existing test parts.
At the start of any section, a Rubric Block, or explanatory text, can be entered prior to the insertion of items. To do this, click on the icon with the letter “A” on it, and then click on the blue New Rubric Block button that appears. Add your text in the space provided.
5. Search for items for your test.
The Library on the left shows the items which can be used in your test.
There are two ways of searching for items:
- Click on the Item drop-down menu above the library. The available item classes, or folders, will be shown in the library below. Click on the folder you wish to open, and the items in it will appear in the library. By selecting one of the two icons to the right of the Item drop-down menu you can choose to view the available items either as a list or in a tree.
- Click on the plus sign to the right of the Search box to carry out an advanced search. A dialog box will appear. Clicking on Choose a value in the State box will open a drop-down menu, which enables you to filter the available items according to their status. Items which have passed through the review process and have been approved are marked final, and it is recommended that you use only these items in your test. Ticking the box on the right will clear your selection. Alternatively, if you know the name of the item you are looking for, you can enter it in the Label box. Clicking on Apply will take you to that item. Click Reset to clear your selection.
From the library, select the item you wish to add, and then click on the blue button that reads Add selected item(s) here.
Note: It is easiest to add items in the order in which they are to appear in the delivered test. If an item is added out of order, however, this can be corrected by clicking the upward or downward arrow buttons which appear after the properties icon on the right of the item. Delete unwanted items by clicking on the trash can icon.
6. See the chapter on Test Settings for information on adjusting assessment settings such as the time/attempts to be allowed. See also Configuring a test for details of other configuration possibilities.
7. Finally, the scoring method must be defined for the test. Possible scoring methods are described in Scoring Tests.