The Asset Manager provides a space to store Assets (media), i.e. images, audio and video and (text) passages (also known as shared stimuli). This is a universally shared folder, which means you don’t need to keep uploading the same files for use in different items. The Assets folder will always appear as an option for choosing input when you are populating items.
Note: In some versions this is called the Media Manager (and the files stored in it are called ‘Media’ rather than ‘Assets’), but they both function in the same way.
The Asset (or Media) Manager now offers a more efficient method of managing assets. Previously, when you saved your item, the resource you had inserted in your item became an integral part of it.
Now, when you use a resource from the Asset (or Media) library, it isn’t integrated in your item, but instead is only referenced by it. When an asset is referenced (rather than integrated) in an item, the physical location of the asset is in the Asset Manager rather than in your item. The advantage of this is that there is only one version of it, so if it is updated, for example, all items which reference that particular resource will automatically also be updated.
The image shows the Asset Manager, with the Asset library on the left and an open asset on the canvas.
The Asset Manager
You will find the same buttons in the Asset Manager, as in most other functions, under the library on the left (New class, Delete, Import, Export, Move To and Access Control). The New class, Delete, and Export buttons work in a very similar way to most of the other functions, as does Move To (use this to move a single file or a whole class to a different location) and Access Control (use this to restrict access to certain users).
The Import button works in a slightly different way in the Asset Manager. Follow the steps below to import a new asset.
1. Click on the Assets icon in the Assessment Builder Bar. The Asset library will appear on the left. Select the folder in the library where you want the new asset to reside.
2. Click on the Import button in the button bank under the library. This will bring up a dialog box in the center of the screen.
3. Choose the input format. You have two choices – a file or a passage.
A file can be a picture, audio or video. The formats supported are: png, jpg, gif, svg, svgz (for images); mp3, ogg, vorbis, webm, mpeg, aac (for audio recordings); and mp4, ogv, mpeg, ogg, quicktime, webm, x-ms-wmv, x-flv (for video clips).
A passage – previously known as a shared stimulus – is an .xml file which contains a simple or complex text (a text with integrated images). See the Passage Editor chapter in the User Guide for information on how to create and edit Passages.
Note: It is possible to store pdf documents in the Asset Manager too. These can contain either just text, or images.
4. When you have chosen the input format, you can either select Browse to browse the files your computer, or you can drag and drop the file into the space provided.
5. When the file has uploaded, click on Import.
Once the file has been imported, you will see the message Asset imported successfully. The new file will appear in the library on the left, in the Asset folder.
6. Click on Continue.
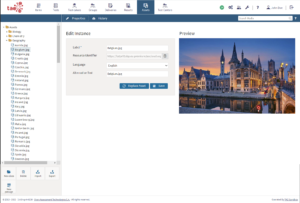
A dialog box labeled Edit instance will appear, with the details of the new asset. This contains the following information:
Label (the name of your imported file)
Alternative Text (rename the file here if you wish)
Language (the default language is English, but you can change the language of the asset if appropriate)
If you want to replace the file with another, click on Upload new asset. Click Save to save the changes, including alternative text.
For information on how to use your assets in new items, see Adding assets to an item. To create a new Passage to add to the Asset library, see the chapter on the Passage Editor.
This website uses cookies so that we can provide you with the best user experience possible. Cookie information is stored in your browser and performs functions such as recognising you when you return to our website and helping our team to understand which sections of the website you find most interesting and useful.
Strictly Necessary Cookies
Strictly Necessary Cookie should be enabled at all times so that we can save your preferences for cookie settings.
If you disable this cookie, we will not be able to save your preferences. This means that every time you visit this website you will need to enable or disable cookies again.
3rd Party Cookies
This website uses Google Analytics to collect anonymous information such as the number of visitors to the site, and the most popular pages.
Keeping this cookie enabled helps us to improve our website.
Please enable Strictly Necessary Cookies first so that we can save your preferences!